Post by Kathy on Jan 23, 2006 11:04:04 GMT -5
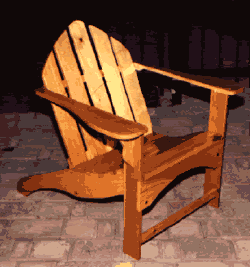
Adirondack style garden chair

Adirondack chairs have become very popular in the past few years. The shape and angle of these chairs is somewhere between a normal garden chair and a slovenly deck chair. The result is a surprisingly comfortable chair that, unfortunately, costs far too much.
Fortunately, making an Adirondack chair is not difficult and can cost as little as $20, depending upon the wood that you use. A sensible wood choice (for duration) would be redwood or oak. However, I was more concerned about the cost of making these, so I opted for the significantly cheaper pine and spent more time varnishing.
Construction
Tools required: Jigsaw, drill, sander, screwdriver
Wood required:
Description Qty Width Length Thickness
Back legs: (2 pieces) 5 1/2" 38" 3/4"
Front legs: (2 pieces) 3 1/2" 24" 3/4"
Arm rests: (2 pieces) 5 1/2" 25" 3/4"
Front support: (1 piece) 1 1/2" 22" 3/4"
Front support (top): (1 piece) 5 1/2" 23 1/2" 3/4"
Seat slats: (13 pieces) 1 1/2" 22" 3/4"
Back support: (2 pieces) 3 1/2" 22 3/4"
Back slats: (5 pieces) 3 1/2" 26" 3/4"
Take the two front legs and designate one end of each one as the top. Cut out a notch 5 1/2" long and 3/4" deep out of the front edge of each leg. This notch should begin 9 1/2" from the bottom of each leg. (So, measuring from the bottom, the notch should begin at 9 1/2" and end at 15"). This notch is used to slot in the Front Support (top) which runs along the front of the chair (behind your legs once sitting in the chair).

Before fastening the Front Support (top) in place, you should cut out a curve, or some other shape, as leaving it as a solid 5 1/2" wide block looks rather ugly. I usually just cut a simple curve, although a more ornate shape would undoubtedly look nicer. Once this is done, glue and screw the Front Support (top) into the notches cut into the two front legs. Ensure the squareness of these before putting the screws in.
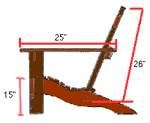
Next, take the two back legs pieces. Cut out the shape of the legs, as shown in diagram one. Note: the back support connects with the back legs 17" from the front of the chair. I have not supplied a more detailed representation of the back leg's shape as it is really up to each individual how it is shaped. Suffice to say that 17" from the front, the shape should have angled upwards.
Once these back legs have been cut to shape, attach them to the inside of the front leg construction. At this point, the seating slats should be attached, thus forcing the back legs to angle correctly. To attach the seat slats, pre-drill each end with a screw hole, and then screw the slats onto the back legs. Work from the front of the chair backwards, until you have completely covered the 17" seating area.
The Back Rest
To build the backrest, you should first construct the bottom back support. Take the 3 1/2" x 22" piece of wood and cut a notch out of each end that is 3/4" deep and 2" high (see diagram opposite).]
Then screw and glue the five back slats onto this back support, keeping them 2" above the bottom of the back support (so they overlap the back support by 1 1/2"). Once this is done, screw and glue the other back support onto the back slats at a height of 13 1/2" to 17" above the bottom of the back slats.
Once this is dry, use the jigsaw to cut the back into a nice curve. the highest point of the curve should be 26", while the lowest part (at each side) should be about 18" (obviously, the exact dimensions are up to the individual). Before the back can be fastened onto the body of the chair, it is necessary to cut the armrests to shape (see diagram right).
Cut the armrests to a shape as shown in the diagram opposite.
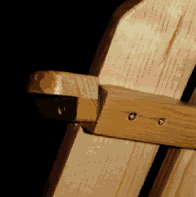
Again, the exact shape is up to you. Attach a small block of wood to the underside of each armrest at the back (see photo). Screw the armrests into the top of the front legs, leaving about 1" sticking back beyond the front legs. Then, attach the backrest by putting a screw through each back leg into the notched part of the back support.
Finally, put a screw through the small lump of wood under the armrest into the upper back support. All that is then needed is to cut a small shaped piece of wood to support the front of the armrest (where it meets the front leg) -- thus stopping it from bending when pressure is placed on it.
The chair should be given at least two coats of marine varnish before being placed outside.
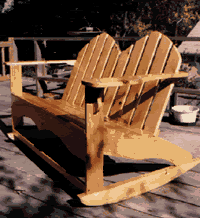
Oh, and for anyone feeling a little bit more adventurous, there are many variations that can be made, such as the two-seater adirondack rock chair shown below.


Adirondack chairs have become very popular in the past few years. The shape and angle of these chairs is somewhere between a normal garden chair and a slovenly deck chair. The result is a surprisingly comfortable chair that, unfortunately, costs far too much.
Fortunately, making an Adirondack chair is not difficult and can cost as little as $20, depending upon the wood that you use. A sensible wood choice (for duration) would be redwood or oak. However, I was more concerned about the cost of making these, so I opted for the significantly cheaper pine and spent more time varnishing.
Construction
Tools required: Jigsaw, drill, sander, screwdriver
Wood required:
Description Qty Width Length Thickness
Back legs: (2 pieces) 5 1/2" 38" 3/4"
Front legs: (2 pieces) 3 1/2" 24" 3/4"
Arm rests: (2 pieces) 5 1/2" 25" 3/4"
Front support: (1 piece) 1 1/2" 22" 3/4"
Front support (top): (1 piece) 5 1/2" 23 1/2" 3/4"
Seat slats: (13 pieces) 1 1/2" 22" 3/4"
Back support: (2 pieces) 3 1/2" 22 3/4"
Back slats: (5 pieces) 3 1/2" 26" 3/4"
Take the two front legs and designate one end of each one as the top. Cut out a notch 5 1/2" long and 3/4" deep out of the front edge of each leg. This notch should begin 9 1/2" from the bottom of each leg. (So, measuring from the bottom, the notch should begin at 9 1/2" and end at 15"). This notch is used to slot in the Front Support (top) which runs along the front of the chair (behind your legs once sitting in the chair).

Before fastening the Front Support (top) in place, you should cut out a curve, or some other shape, as leaving it as a solid 5 1/2" wide block looks rather ugly. I usually just cut a simple curve, although a more ornate shape would undoubtedly look nicer. Once this is done, glue and screw the Front Support (top) into the notches cut into the two front legs. Ensure the squareness of these before putting the screws in.
Next, take the two back legs pieces. Cut out the shape of the legs, as shown in diagram one. Note: the back support connects with the back legs 17" from the front of the chair. I have not supplied a more detailed representation of the back leg's shape as it is really up to each individual how it is shaped. Suffice to say that 17" from the front, the shape should have angled upwards.
Once these back legs have been cut to shape, attach them to the inside of the front leg construction. At this point, the seating slats should be attached, thus forcing the back legs to angle correctly. To attach the seat slats, pre-drill each end with a screw hole, and then screw the slats onto the back legs. Work from the front of the chair backwards, until you have completely covered the 17" seating area.
The Back Rest
To build the backrest, you should first construct the bottom back support. Take the 3 1/2" x 22" piece of wood and cut a notch out of each end that is 3/4" deep and 2" high (see diagram opposite).]

Then screw and glue the five back slats onto this back support, keeping them 2" above the bottom of the back support (so they overlap the back support by 1 1/2"). Once this is done, screw and glue the other back support onto the back slats at a height of 13 1/2" to 17" above the bottom of the back slats.
Once this is dry, use the jigsaw to cut the back into a nice curve. the highest point of the curve should be 26", while the lowest part (at each side) should be about 18" (obviously, the exact dimensions are up to the individual). Before the back can be fastened onto the body of the chair, it is necessary to cut the armrests to shape (see diagram right).

Cut the armrests to a shape as shown in the diagram opposite.

Again, the exact shape is up to you. Attach a small block of wood to the underside of each armrest at the back (see photo). Screw the armrests into the top of the front legs, leaving about 1" sticking back beyond the front legs. Then, attach the backrest by putting a screw through each back leg into the notched part of the back support.
Finally, put a screw through the small lump of wood under the armrest into the upper back support. All that is then needed is to cut a small shaped piece of wood to support the front of the armrest (where it meets the front leg) -- thus stopping it from bending when pressure is placed on it.
The chair should be given at least two coats of marine varnish before being placed outside.
Oh, and for anyone feeling a little bit more adventurous, there are many variations that can be made, such as the two-seater adirondack rock chair shown below.


